This release updates WordPress XSS rule metadata in the Cloudflare Managed Ruleset and Cloudflare Free Ruleset to identify XSS2Shell (CVE-2026-64638). It also disables the Command Injection - Obfuscation rule.
Key Findings
CVE-2026-64638: A pre-authentication reflected cross-site scripting vulnerability affecting the WordPress login screen. Exploitation requires social engineering and explicit interaction by the target user. Under additional conditions, it may be escalated to remote code execution.
Impact
The WordPress changes update rule metadata only; detection behavior and actions remain unchanged.
AI Search gets you from a data source to a working search endpoint quickly. This release adds what you need to put that endpoint in front of real users: your own domain, authentication, and one endpoint across several instances. It also adds crawling for sites without a complete sitemap, so your index covers everything you want it to find.
Each of the following is a new option. The previous behavior is still the default, so nothing changes until you change it.
Serve search from your own domain
A public endpoint is a URL that a site or app can query directly, with no authentication in front of it. By default that URL is a generated hostname on search.ai.cloudflare.com. You can now serve the same endpoint from a custom domain, a hostname in a zone that you own:
https://search.example.com/search
Restrict who can query your content
Once your endpoint is on your own domain, you can put Cloudflare Access in front of it. For example, you usually want to give /mcp to specific agents rather than to anyone who finds the URL. Agents authenticate with an Access service token, and people who open the endpoint in a browser sign in through your identity provider.
Search several instances from one URL
A namespace can expose its own public endpoint with /search, /chat/completions, and /mcp paths that fan out across the instances you choose:
curl https://ns-<NAMESPACE_ENDPOINT_ID>.search.ai.cloudflare.com/search \
  --header "Content-Type: application/json" \
  --data '{
    "messages": [{ "content": "How do I configure AI Search?", "role": "user" }],
    "ai_search_options": { "instance_ids": ["docs", "support"] }
  }'
Index your sites without a sitemap
Website data sources support a new discoverparse type. It starts at the source URL and collects pages from both your sitemaps and the links it finds while crawling:
Kitesurf is Cloudflare's new stateless, highly scalable browser that runs entirely on top of Workers and is designed for AI agents. It is available for free while in beta.
Compared to Chromium, Kitesurf uses 3–7× less CPU and memory for common agentic tasks like screenshots and HTML extraction, so you can run more sessions and scale better for bursty, AI-driven workloads.
Your existing clients already work. To opt in, add the browser=kitesurf parameter to any Browser Run CDP or Quick Action endpoint:
AI Gateway now includes User Insights, a dashboard that gives you two things at once: clear visibility into how much your organization spends on AI, and a security signal that surfaces users whose usage suddenly looks abnormal. It works on the traffic already flowing through your gateway, so there is no additional setup.
On the spend side, User Insights shows organization-wide totals for cost, requests, tokens, and adoption, and lets you drill into an individual user to see their spend, top models and providers, cache hit rate, and more. To attribute usage to individual users, add a user identifier with custom metadata or put your gateway behind Cloudflare Access.
On the security side, User Insights baselines each user's normal usage from their 95th percentile (p95) session cost over the last 30 days, then flags sessions that exceed both that baseline and an organization-level threshold. A sudden jump above a user's own pattern is often the first sign of a compromised credential or a misbehaving agent, so you can investigate before it shows up on your bill.
User Insights is available to all AI Gateway customers at no additional cost.
AI Gateway now integrates with Cloudflare Access, giving you two new capabilities:
Protect your gateway endpoint. Put your AI Gateway behind Access so you can set policies that control who is allowed to call a specific gateway's endpoint.
Identity-aware controls. When traffic reaches AI Gateway through an Access-protected custom domain, AI Gateway can use the authenticated user's Access identity in logs, analytics, routing, and spend controls.
With identity-aware controls, you can set spend limits by authenticated user, control which gateways different users can access, filter logs by user, and build policies without passing user IDs from the client application. AI Gateway adds the verified Access user ID to request metadata as cf.user_id.
OAuth consent screens now display a shield icon with explanatory text beneath the consent screen title. Each shield icon indicates who owns the application and whether its domain ownership is verified.
Green filled shield: Cloudflare owns and manages the application.
Blue outlined shield: A third-party application with verified ownership of its domain.
Amber filled shield: A third-party application without verified ownership of a domain.
Domain verification only confirms that the application owner controls the displayed domain.
Agent tracing is now available for applications built with the Agents SDK. Traces show each agent turn alongside model calls, tool runs, approvals, token usage, and Workers runtime operations.
Turn on Workers tracing in your Wrangler configuration:
Think and Flue applications emit agent traces automatically. For direct AI SDK calls, wrap the AI SDK namespace once. wrapAISDK() supports AI SDK v6 and v7. This AI SDK v7 example also supplies the agent identity:
import * as ai from "ai";import { wrapAISDK } from "agents/observability/ai";const tracedAI = wrapAISDK(ai);await tracedAI.generateText({ model, prompt: "Find an available appointment", runtimeContext: { agentId: "booking-agent-production", conversationId: "conversation-123", }, telemetry: { functionId: "booking-agent", includeRuntimeContext: { agentId: true, conversationId: true, }, },});
import * as ai from "ai";import { wrapAISDK } from "agents/observability/ai";const tracedAI = wrapAISDK(ai);await tracedAI.generateText({ model, prompt: "Find an available appointment", runtimeContext: { agentId: "booking-agent-production", conversationId: "conversation-123", }, telemetry: { functionId: "booking-agent", includeRuntimeContext: { agentId: true, conversationId: true, }, },});
Message and tool payload recording is off by default. Turn it on only when the payloads are safe to store:
Open the Agents tab ↗ in the Cloudflare dashboard to inspect sessions, replay conversations, and view trace waterfalls. For advanced setup, privacy controls, and trace structure, refer to Agent tracing.
You can now run your CI/CD pipeline on your Artifacts repo by defining a CI Workflow with the CI SDK ↗, automatically triggered on Artifacts push events.
This allows you to:
Automatically build and deploy application code stored in Artifacts.
Run linting, type checking, tests, and other checks on every push.
Reuse dependencies when the lockfile (i.e. pnpm-lock.yaml) has not changed.
Define your CI steps with @cloudflare/ci. Each ci.runner() spins up an isolated sandbox, and the cache option reuses installed dependencies across each sandboxed step in your CI job.
Point cache.inputs at your lockfile (i.e. pnpm-lock.yaml, bun.lock), and the install step only runs again when that lockfile changes:
You can now create standalone Free accounts directly from the Cloudflare dashboard using the new Create Account button. This feature is currently available to all users.
When creating a Free account:
You can create up to 5 Free accounts.
Your user account must have at least 7 days of tenure to be eligible.
The account is created immediately and ready to use.
To create a Free account, go to the Cloudflare dashboard ↗ and select Create Account from either the account switcher in the top left (where your account name appears) or from the Accounts page.
Limitations
This feature can only be used to create a Cloudflare Free account. To create an Enterprise Account under your existing contract, please contact Cloudflare Support.
All users can create a Cloudflare Free account, however, Enterprises wish to restrict this action to only Super Administrators. We will deliver this improvement in a future release.
You can now store up to 20 million vectors in a single Vectorize index, doubling the previous limit of 10 million vectors. This enables larger-scale semantic search, recommendation systems, and retrieval-augmented generation (RAG) applications without splitting data across multiple indexes.
Vectorize continues to support indexes with up to 1,536 dimensions per vector at 32-bit precision. Refer to the Vectorize limits documentation for complete details.
This release introduces new rules and updates Microsoft SharePoint RCE alongside enhanced SSRF cloud protection rule actions.
Key Findings
CVE-2026-50522: An insecure deserialization vulnerability in Microsoft SharePoint Server. This may allow an unauthenticated attacker to execute arbitrary code using crafted requests.
CVE-2026-66066: An improper input processing vulnerability in Ruby on Rails Active Storage image variant transformations. This may allow an unauthenticated attacker to perform arbitrary file reads and achieve Remote Code Execution (RCE) using maliciously crafted payload requests.
wrangler dev and vite dev automatically capture structured OpenTelemetry traces and correlated console logs during local Worker invocations.
Debug with AI agents
When the tooling detects an AI agent session, it prints a terminal hint pointing to the Local Explorer API at /cdn-cgi/explorer/api. The API serves an OpenAPI schema and exposes a read-only observability query endpoint for discovering telemetry, querying traces and logs, and inspecting binding state.
The agent can identify the exact failing operation, fix the code, rerun the request, and verify the result. This debug loop requires no deployment or temporary logs.
Inspect traces in Local Explorer
Humans can inspect the same traces and correlated console logs in the Local Explorer browser UI. Each trace shows spans, timing, attributes, and errors.
Automatic spans cover handler calls, outbound fetch() calls, and binding calls. Custom spans appear alongside these automatic spans.
Workers now enable the nodejs_compat and nodejs_compat_v2 compatibility
flags by default for compatibility dates
of 2026-08-04 or later. These flags are not used for these compatibility
dates because the compatibility date enables the same behavior.
This means all Node.js built-in APIs supported
by the Workers runtime are available by default, including node:crypto,
node:buffer, node:stream, node:net, node:dns, node:fs, node:http,
and more. npm packages that depend on these APIs will work without additional
configuration.
Workers using an earlier compatibility date are not affected. They can still
opt in by adding nodejs_compat to compatibility_flags.
New projects do not need to add either flag. Existing projects can update their
compatibility date without removing them. Wrangler, Miniflare, the Cloudflare
Vite plugin, and Vitest Pool Workers ignore these redundant flags when starting
the runtime.
To turn off Node.js compatibility completely, remove any nodejs_compat and
nodejs_compat_v2 flags. Then add both of the following flags:
{ "$schema": "./node_modules/wrangler/config-schema.json", // Set this to today's date "compatibility_date": "2026-08-22", "compatibility_flags": [ "no_nodejs_compat", "no_nodejs_compat_v2" ]}
# Set this to today's datecompatibility_date = "2026-08-22"compatibility_flags = ["no_nodejs_compat", "no_nodejs_compat_v2"]
wrangler login now supports the OAuth 2.0 Device Authorization Grant ↗. Pass --device to authenticate without starting a temporary callback server on localhost:8976:
npx wrangler login --device
Wrangler prints a verification URL and a short user code, opens the URL in your default browser with the code already filled in, and polls Cloudflare for an access token while you approve the request:
⛅️ wrangler 4.119.0────────────────────Attempting to login via OAuth Device Authorization Grant...To authorize Wrangler, please visit: https://dash.cloudflare.com/oauth2/deviceand enter the code: WDJB-MJHTYou have 5 minutes to approve this request.Opening a link in your default browser: https://dash.cloudflare.com/oauth2/device?user_code=WDJB-MJHTSuccessfully logged in.
The default login flow needs your browser to reach localhost:8976, which is not always possible from containers, remote SSH sessions, or GitHub Codespaces. Previously these environments required forwarding ports or fetching the callback URL with curl from a second terminal session. Because --device has no callback server, those workarounds are no longer necessary.
Since the plain verification URL and user code are both printed to the terminal, you can also approve the request from a phone or another machine. Pass --browser=false to stop Wrangler from opening a browser at all.
Available in Wrangler version 4.119.0 or later. For more information, refer to wrangler login.
Cloudflare Access administrators can now control whether a self-hosted application preemptively sets authorization cookies across its public hostnames.
Previously, Access automatically used eager redirects for applications with five or fewer hostnames. Applications with more than five hostnames received cookies as users visited each hostname. Administrators can now choose either behavior, regardless of the number of hostnames.
The new Eager redirect cookie setting is turned on by default for new applications. After a user signs in, Access redirects the browser through each hostname and sets a CF_Authorization cookie. This supports applications that need to make requests across hostnames before the user visits each one.
For applications with many hostnames, the redirect chain can cause sign-in loops in some browsers. Turn off the setting to issue the cookie only when a user visits each hostname.
We're releasing an early preview of @cloudflare/computer ↗, an open-source agent runtime that gives every agent its own computer. The runtime dynamically orchestrates between fast, efficient isolates and full Linux containers, so the agent always runs on the right compute primitive for the task at hand.
@cloudflare/computer provides a virtual filesystem backed by SQLite, which you can populate from cloud storage, source control, or any files you choose. Agents can read, write, and edit files, run shell commands, and interact with Git repositories. All operations are gated, audited, and observed.
Install the package via npm:
npm install @cloudflare/computer
Instantiate a Workspace inside any Durable Object to give your agent a filesystem and execution runtime:
import { Workspace } from "@cloudflare/computer";export class Agent { workspace = new Workspace({ storage: this.ctx.storage, });}
Several execution backends are included or you can write your own:
Isolate runtime — fast, horizontally scalable execution via just-bash and Dynamic Workers, ideal for file manipulation and data processing.
Container runtime — full Linux environment via Cloudflare Containers, mounted through FUSE, for tasks that need native binaries, package managers, or a complete userland.
The AI SDK-compatible toolkit provides common agent tools (read, write, edit, ls, exec) and guides the model to choose the appropriate backend for each task.
Load balancing analytics now shows traffic served by your fallback pool separately from traffic routed to the same pool by normal steering.
Previously, requests were grouped by pool name alone. If the pool acting as your fallback also received traffic through your steering policy, both appeared as a single series, so it was not obvious from the graph whether Cloudflare was still making health-based routing decisions or had fallen back to the pool of last resort. Because the fallback pool ignores health, that distinction matters when you are diagnosing an outage or reviewing how much traffic was shed.
Fallback traffic is now labeled with the pool name followed by (Fallback). A pool named eu-west, for example, is shown as eu-west (Fallback). This label appears as its own entry in:
Requests over time, as a separate series in the chart.
Pool distribution, as a separate segment.
Top endpoints, as a separate card for the pool.
The Latency view and the health event Logs are unchanged.
To see this, go to Traffic > Load Balancing Analytics for a zone. The same breakdown appears in the analytics view for an individual load balancer under Load Balancing at the account level.
Billing is now enabled for Cloudflare Pipelines on non-enterprise accounts. Pipelines usage beyond the included free tier will appear on your next invoice.
Pipelines charges based on two usage dimensions. Ingress into a Pipeline stream remains free regardless of volume:
Sinks (egress): $0.03 / GB for JSON output, $0.06 / GB for Parquet or Iceberg output.
Workers Paid plans include 50 GB / month for both SQL transforms and sinks. Standard R2 storage and operations charges apply for data written to R2 buckets, and R2 Data Catalog charges apply when writing to Iceberg tables.
For example, a pipeline that ingests 500 GB of event data per month, uses a SQL transform to filter and reshape it, and writes 300 GB to an R2 Data Catalog Iceberg table would be billed as follows:
Dimension
Usage
Included
Billable
Cost
Streams
500 GB
Unlimited
0 GB
$0.00
SQL transforms
500 GB
50 GB
450 GB
$18.00
Sinks (Iceberg)
300 GB
50 GB
250 GB
$15.00
Total
$33.00
For full pricing details and billing examples, refer to Pipelines pricing.
Billing is now enabled for R2 Data Catalog on non-enterprise accounts. R2 Data Catalog usage beyond the included free tier will appear on your next invoice.
Catalog operations: $9.00 / million operations for metadata requests such as creating tables, reading table metadata, and updating table properties.
Compaction: $0.005 / GB processed and $2.00 / million objects processed. These charges only apply when automatic compaction is turned on for a table.
Each dimension includes a monthly free tier: 1 million catalog operations, 10 GB of compaction data processed, and 1 million compaction objects processed.
For example, a single Iceberg table with 50 GB of data, 500,000 catalog operations per month, and compaction turned on that processes 20 GB across 200,000 files would be billed as follows:
Dimension
Usage
Included
Billable
Cost
Catalog operations
500,000
1,000,000
0
$0.00
Compaction (data processed)
20 GB
10 GB
10 GB
$0.05
Compaction (objects)
200,000
1,000,000
0
$0.00
Total (Data Catalog)
$0.05
Standard R2 storage charges ($0.015 / GB-month) apply separately for the 50 GB of data stored.
Billing is now enabled for R2 SQL on non-enterprise accounts. R2 SQL usage beyond the included free tier will appear on your next invoice.
R2 SQL charges based on a single dimension:
Data scanned: $0.0025 / GB ($2.50 / TB) of compressed data read from R2 to execute your query.
All plans include 10 GB of data scanned per month. Each query is billed for a minimum of 10 MB of data scanned. R2 SQL pricing is additive to standard R2 storage and operations and R2 Data Catalog charges. R2 does not charge for egress, so there is no additional data transfer cost.
For example, a user who stores 500 GB of Parquet data in R2 Data Catalog and runs queries that scan a total of 50 GB of compressed data during the month would be billed as follows:
Dimension
Usage
Included
Billable
Cost
R2 storage
500 GB-month
10 GB-month
490 GB-month
$7.35
R2 SQL (data scanned)
50 GB
10 GB
40 GB
$0.10
Total
$7.45
For full pricing details and billing examples, refer to R2 SQL pricing.
You can now call methods between Python and JavaScript Workers using Workers RPC. This works through Service bindings without extra dependencies, schema definitions, or serialization code.
Cross-language RPC calls behave like ordinary function calls. Exceptions propagate to the call site. You can pass structured cloneable types ↗ as parameters or return values, and Pyodide Foreign Function Interface (FFI) automatically converts types between languages.
Call a TypeScript Worker from Python
Define a method in a TypeScript Worker:
index.jsjs
import { WorkerEntrypoint } from "cloudflare:workers";export class RpcService extends WorkerEntrypoint { async add(a, b) { return a + b; }}
index.tsts
import { WorkerEntrypoint } from "cloudflare:workers";export class RpcService extends WorkerEntrypoint { async add(a: number, b: number): Promise<number> { return a + b; }}
Call it from a Python Worker through a Service binding:
This beta release includes the following changes and improvements:
Improved connection reliability: the client now swaps protocol order after repeated connectivity-check failures, which helps when HTTP/3 is blocked after the QUIC handshake.
Fixed issue where a certificate error could be incorrectly displayed right after the connection is established.
Fixed a MASQUE issue where the tunnel could stall while uploading at a high rate.
Fixed being unable to switch organizations when the client was stuck in the "Device not in organization" state.
Fixed the Home Screen dropdown popup not anchoring correctly.
Fixed a crash during dialog dismissal.
Increased tolerance for configurations with a large number of local domain fallback resolver IPs, so DNS resolution behaves correctly even when more fallback resolvers are configured than recommended.
Fixed a networking issue where IPv6 multicast routes were being assigned to the WARP tunnel interface.
Fixed fatal errors on UI load on Windows 10.
Fixed a crash during Windows notification initialization.
This beta release includes the following changes and improvements:
Improved connection reliability: the client now swaps protocol order after repeated connectivity-check failures, which helps when HTTP/3 is blocked after the QUIC handshake.
Fixed issue where a certificate error could be incorrectly displayed right after the connection is established.
Fixed a MASQUE issue where the tunnel could stall while uploading at a high rate.
Fixed being unable to switch organizations when the client was stuck in the "Device not in organization" state.
Fixed the Home Screen dropdown popup not anchoring correctly.
Fixed a crash during dialog dismissal.
Increased tolerance for configurations with a large number of local domain fallback resolver IPs, so DNS resolution behaves correctly even when more fallback resolvers are configured than recommended.
Fixed the WARP client stealing window focus (for example, during reauth).
Fixed a client crash when connecting to a captive portal over Wi-Fi.
Fixed the system tray icon showing "disconnected" while the UI showed "connected".
A successful re-authentication will cause the device profile to be re-evaluated.
MCP server portals can now connect to upstream MCP servers that require a pre-registered OAuth client. This supports OAuth providers that do not offer Dynamic Client Registration or have disabled it. This unlocks portal connections to major SaaS providers such as Slack and GitHub, whose MCP servers do not yet support DCR.
When adding an MCP server, administrators can enter the client ID and client secret from an OAuth application registered with the upstream provider. The configuration also supports custom OAuth endpoints, scopes, and the client_secret_post and client_secret_basic token endpoint authentication methods.
Cloudflare stores the client secret encrypted. Users still authenticate to the upstream server with their own accounts when they connect through a portal.
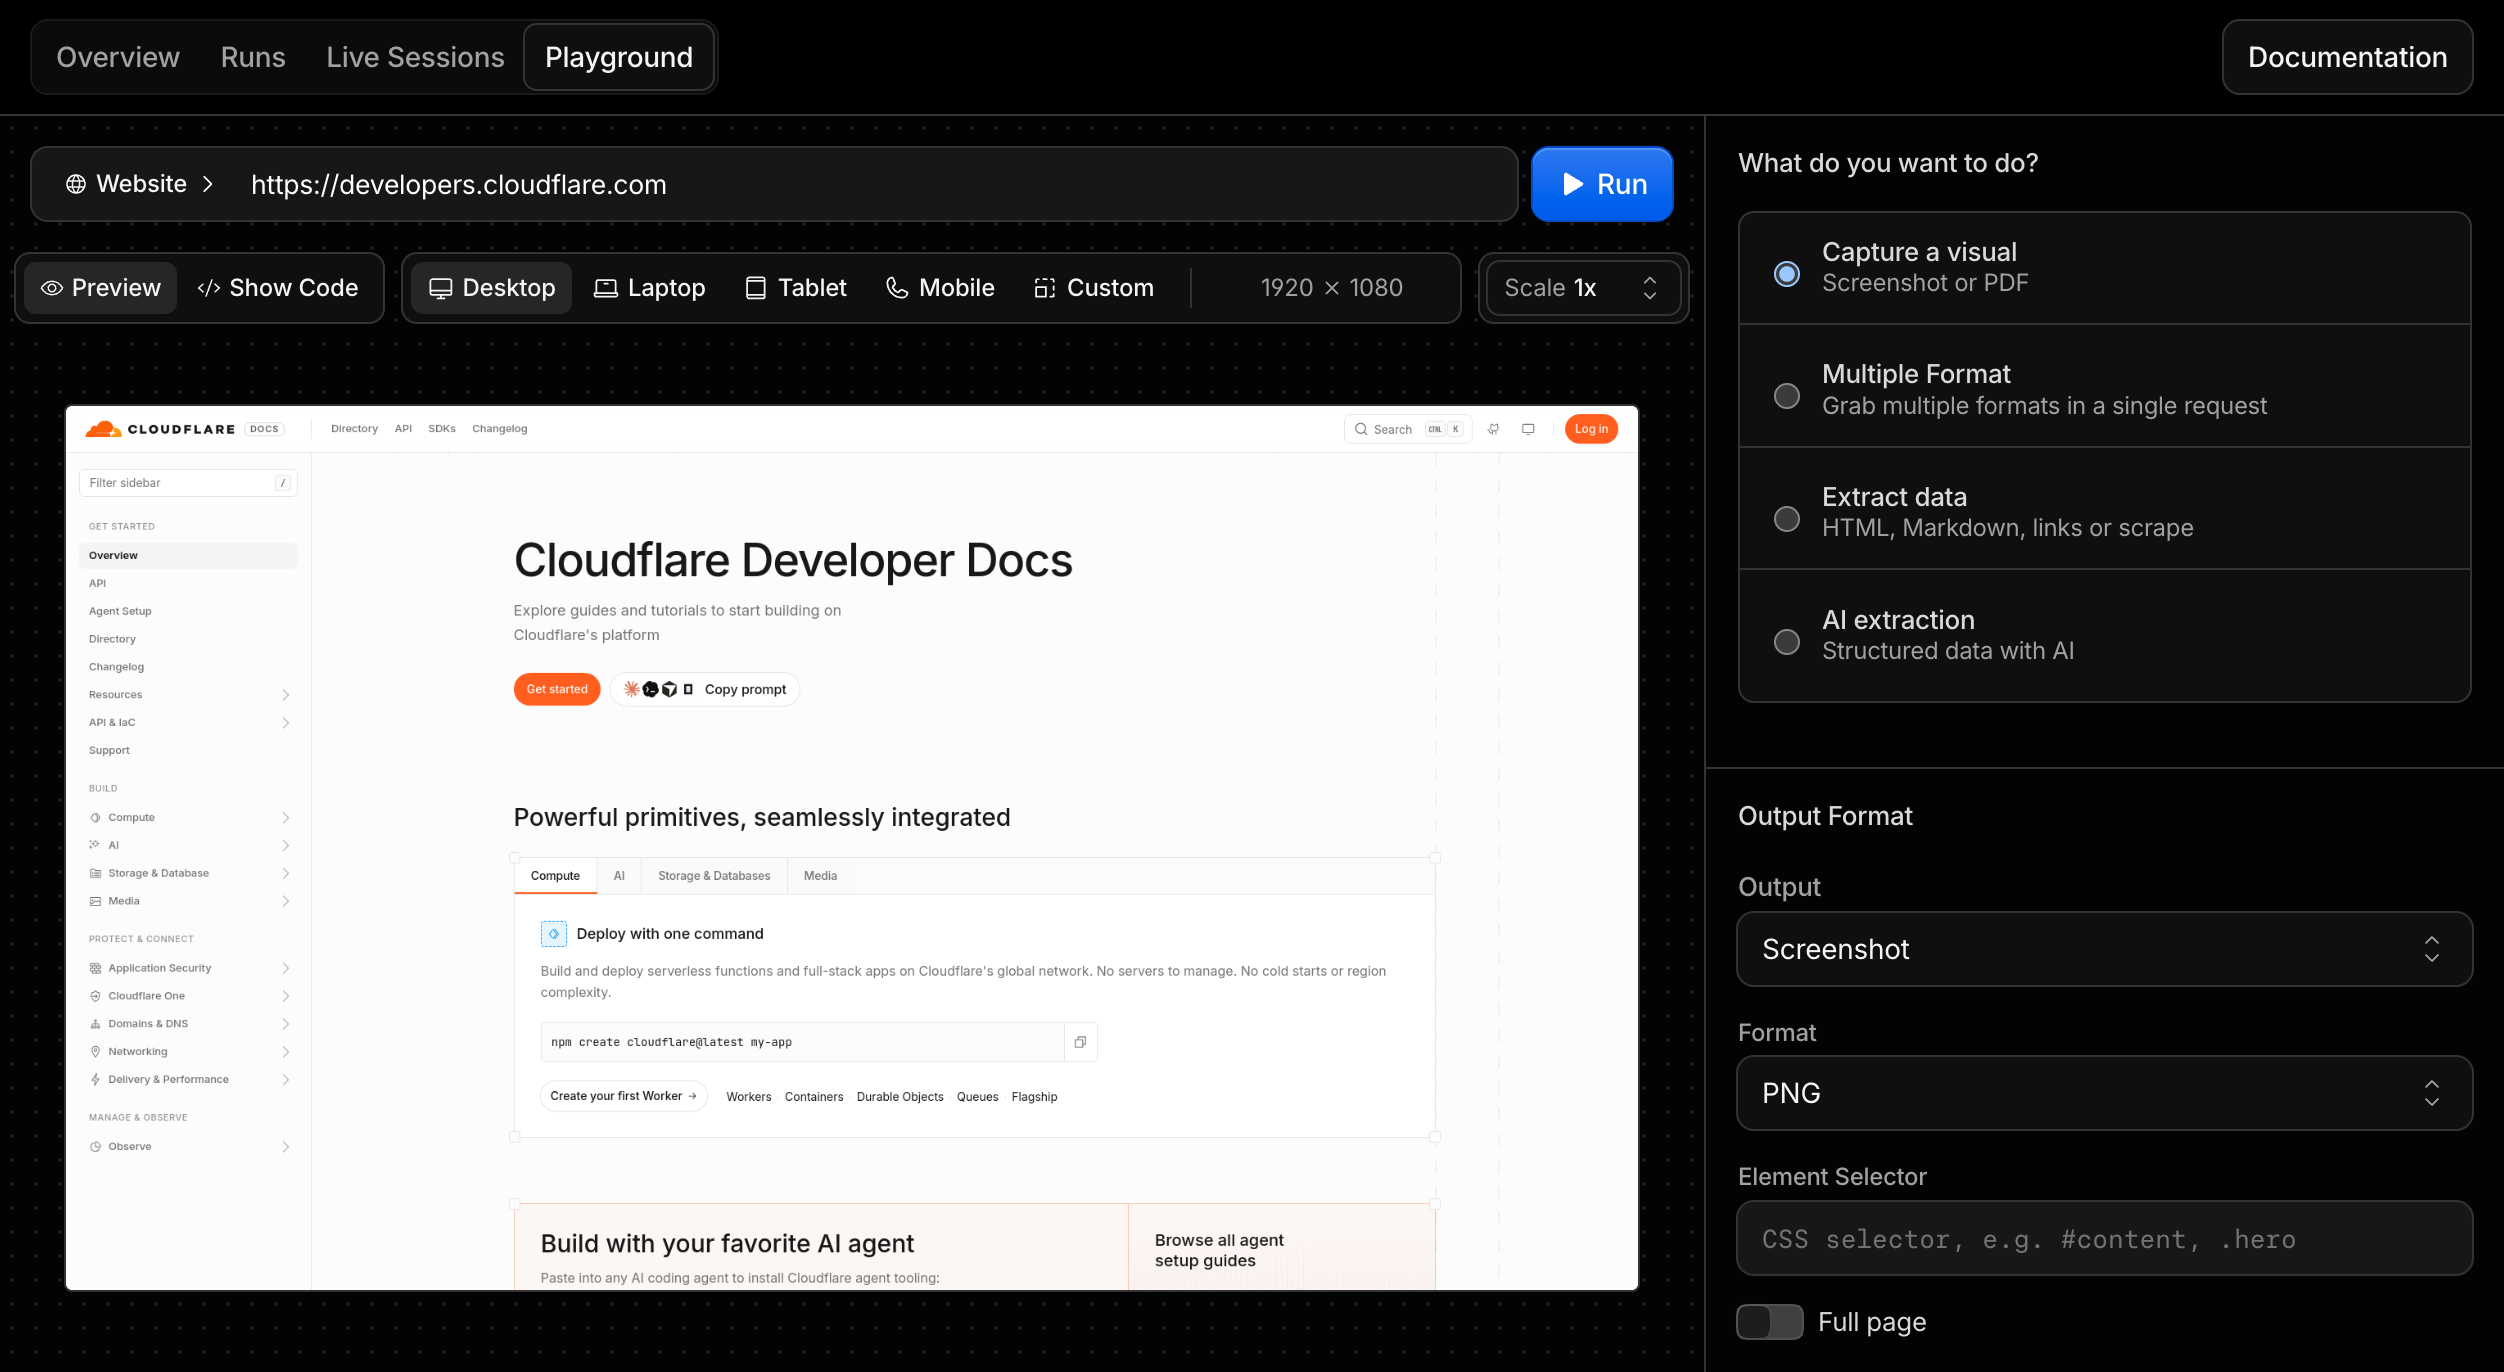
Browser Run now includes a Playground in the Cloudflare dashboard. Use it to try Quick Actions against a live browser without creating a Worker, installing an SDK, or deploying code first.
The Playground helps you test a target URL or raw HTML input, tune viewport and page-load settings, preview the output, and copy working code for the same request.
You can also configure desktop, laptop, tablet, mobile, or custom viewport sizes, set browser scale, choose page-load conditions, set timeouts, and wait for selectors before running a request.
Select Show Code to generate the same request as cURL, TypeScript SDK, Python, or Workers Binding code. For example, a screenshot request can be copied as a Workers Binding call: